
Fabletics
It's highly likely I am just late to the game on this one but I just discovered Kate Hudson's new athletic clothing line and I'm shocked I haven't discovered it sooner. Kate Hudson is one of my favorite ladies in Hollywood and I'm usually all over her jock.

The line is comfortable and affordable athletic clothing with a fun spin. When you sign up, your first outfit is only $25. You can get a 2 piece or 3 piece outfit which is kind of crazy considering one pair of my favorite VS yoga pants are close to $60. You'd start to question the quality but they do not cut corners! The quality is great and I am in love with the colors and patterns. When you sign up you fill out a short questionnaire with your workout preferences, colors that excite you etc. It's their way of getting to know you. On the first of every month they send you an outfit at a discounted rate. You can purchase the outfit or pass. There's no obligation to buy. I personally love it!
Stock runs out super quickly though so if you're interested, get in at the beginning of the month. I'm all over this!! CLICK HERE TO CHECK IT OUT
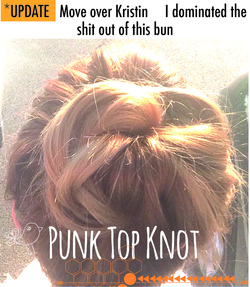
Punk Top Knot
As promised, I tried this again. I loved the look so much, I wasn't ready to give up on it yet. What I did differently....
Dirty hair is a must Dry Shampoo or backcomb powder, also a must Tease the hell out of the top and sides. Wrap your bun loosely after you twist (this is where I was going wrong. I was wrapping mine too tightly) Bobby pin in place Hairspray it to death.
If you have layers or shorter pieces, do your twist then spray it with hairspray to keep it all together. You can see my shorter pieces coming out in my first attempt. Scroll below for the full tutorial and keeps these updated tips in mind.
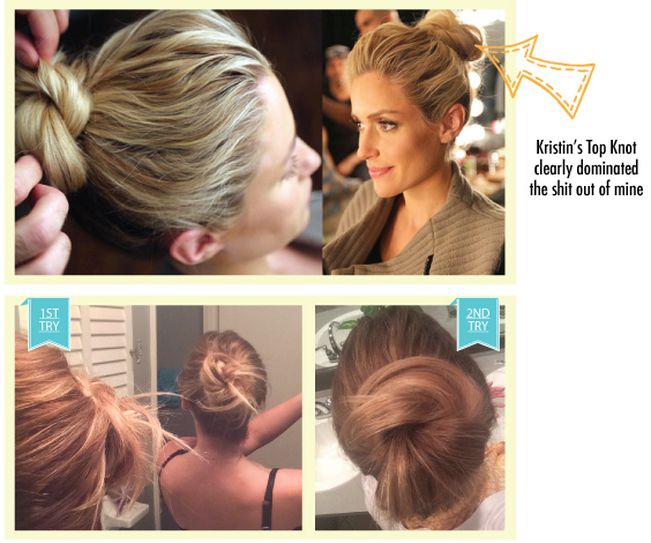
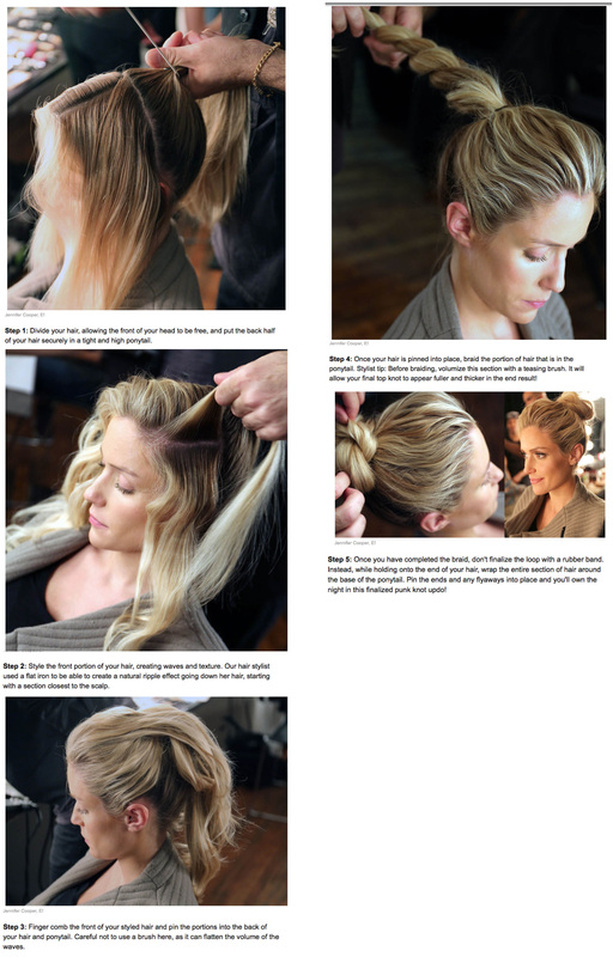
If you read my previous post, you know I'm in love with a new show on E! called Fabulist. I was dying over Kristin Cavallari's hair in this week's episode so I decided to give it a go. I found step-by-step instructions online but I am not a hairstylist and who can ever do up do's as good as they do, I mean seriously. I tried my own spin and it was less than ideal. My hair is the same length as Kristin's but mine is baby fine and really soft which isn't prime for up do's. My hair is too slick and doesn't like to hold. You couldn't tell I even twisted my pony and it all kind of mushed together. I'm not ready to give up on this do just yet though. I think for this to work on MY hair, I need to use more product and to do it on dirty hair. I'm also going to try to add in a track or two of my weave and see if the thickness helps me. One thing is for sure, this is not a hair style to do in the morning on the fly. I also saved the heat/damage to my hair by only curling the front instead of all of my hair and I used a curling iron instead of a straightener. I did this for two reasons 1. My straightener gets hotter on my hair (again trying to reduce the damage) 2. I couldn't twist it the way he was haha whatever.
I also have a few long layers in my hair so I had a lot of pieces coming out in my first attempt. I think they could've easily been hidden with better twisting and product.
Here are the instructions...if you get a successful Punk Top Knot, I dare you to share it because I will bow down to whatever non-professional can master this.
Coconut Oil Pulling
UPDATE:So I went to the dentist yesterday after coconut oil pulling for a few months and couldn’t wait to show off my progress. I was pumped to see if the hygienist noticed a difference since she cleans my teeth every 6 months. Sure as shit she said, “Holy crap, what the hell have you been doing to your teeth? There’s nothing on there for me to scrape off and dive into!” I told her what I had been doing and she couldn’t believe it. I was her first patient to pull oil and she was very impressed.
She barely had to do anything to my teeth during the cleaning. I was in and out of the chair in 20 minutes. I won’t lie, I slacked majorly. I went from a few times a week to only swishing once every week or every other week. I melt about a tablespoon in the microwave for a few seconds. It doesn’t need to go long because it has a low melting point. I throw it back and get in the shower. I swish while I’m doing my biz and spit it in the trashcan 20 minutes later. All of the details are in the previous posts. NEVER spit coconut oil down your drain. It hardens in your drain pipes and will cause a problem. You don’t have to melt the oil first but I promise you will gag if you don’t.
She also thought I whitened my teeth because they were about 4 shades whiter than last time I was in there. When my dentist came in, he couldn’t believe it and told me not to tell my friends because I would put him out of business. Oooops…I technically didn’t just tell my friends. I told the 600 people who read this blog everyday in 76 different countries.
__________________________________________________
I am obsessed with the Fabulist. It's a new show on E! with Kristin Cavallari and Orly Shani. They discuss the latest beauty and fashion trends and guinea pig themselves for reviews. Pretty much what I do but they are on tv, rich and far more amaze than I am. Plus Kristin C. is ALWAYS on point and is one of my style icons.
They covered coconut oil pulling on Fabulist this week and Kristin's reaction/reflux is pretty much exactly how my first attempt went. I only did it for about a week as I had to start talking myself into doing it each morning. (Sidenote* I am going to try to recreate Kristin's Punk Top Knot hairstyle in the below video for my next post) Click the image to play!

I don't think it helped with my migraines like it claimed to but I also think I need to do it for more than a week. It DID whiten my teeth and pulled all of the junk off of them. You know how your teeth can sometimes feel like they are wearing a wool sweater by the end of the day? No? Just me? Assholes. Well this keeps that feeling away. It also removed some of the coffee/tea stains on my teeth that a toothbrush just can't seem to tackle. I did take before and after photos of my teeth but you couldn't see the difference in the photos as my teeth are generally pretty white. I think I felt the difference more than I really saw it. In conclusion, coconut oil is basically the holy grail right now in the beauty world and is said to do everything short of curing cancer. Give it a whirl, why the hell not.
Chunky Bohemian Braid Tutorial

Today I tried a new chunky Bohemian Braid that I’m kind of dying over. I love braids and was looking for some new ones. I found this one on Pinterest and gave it a whirl. If you don’t follow me on Instagram, you should because I post way more shit on there, search sawsandstilettos. I already knew before I started that it wasn’t going to look good because my hair isn’t as long as hers and it’s super fine and soft (thank you cocnut oil for the silky locks).
So I threw in a few tracks of weave for length, texture and thickness. If you already have textured or coarse hair, you shouldn’t have a problem. This braid is not silky-hair friendly. Doing it on dirty hair is better because clean hair is slick and will slide out of the braid. Clipping in some weave is also great if you have layers because it gives the braid something to hold on to if your shorter pieces fall out. The longer the day goes on, the more messy-chic it looked.
Remember when we were little and spent so much time making sure there weren’t ANY bumps in our pony and would slick it back with a black bristle brush and a shit ton of hairspray? Who would’ve thought we’d be spending hours strategically creating bumps and making it look messy-cute?
As far as weave, I enjoy clip-ins so you don’t have to deal with the maintenance of tape or bead extensions and they don’t damage your hair. Or if you have OCD like I do and feel like you have to run your hands cleanly through your hair, this is a better option for you. Mine are Remy Human Hair in the longest length and I believe the color is blonde frost. You can put heat on them, cut them, dye them etc. and are anywhere between $80-$125. I believe shorter ones are less expensive. I just figured if I was going to buy them, I’d go balls out. They can be a little heavy and hot if you’re not used to long hair so I like the option of being able to take them out. You wash them and care for them just like your regular hair. I've had mine for almost a year and they still look just as great as the day I bought them. I have had my hair dyed several ways and several shades of blonde and these have always matched perfectly with whatever I had going on.
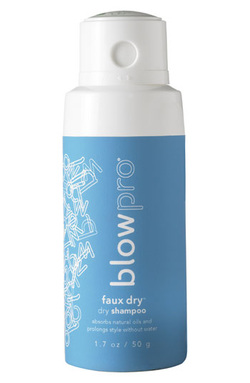
I started by applying my new FAVORITE dry shampoo. It’s called Blow Pro and it’s a white powder in a small blue bottle. I reached out to the ladies of the Elvis Duran Morning show and they ALL use this and raved about it so I had to try it. I’ve tried a ton of dry shampoos in my day and this one is by far the best I’ve ever had. I have blonde hair, my sister has really dark brown and we both use it. Other than the product being legit, the bottle really tickled my fancy. You shake it, turn the lid open and squeeze at the sides and it poofs out! I had no idea how to work it so I apologize to the employees in the Ulta isle who had to clean up the white powder mountain I made. Using this product gives me the giggles.
Anyway, I applied dry shampoo and teased the crown of my head for volume. I pulled up a section of hair towards the bottom, snapped in my weave and repeated this step once more only up a little higher. I only applied two tracks (or wefts as the snooty people call them). If you need more, throw on more. There are tutorials all over the Internet telling you how to apply them. I would tell you but I had blood drawn today to diagnose my typhoid and my arm hurts. Sue me. After all of my weave was attached, I pulled my bangs back into a bobby pin at the top of my head. I have long bangs but I knew they’d come out of the braid and I didn’t feel like dicking with that today.
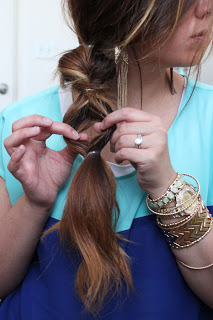
Next, I followed these steps I found on Pinterest with a little bit of modification. Gather all of your hair to the side you want your braid to run down and secure it with a clear elastic ponytail holder. Create an ‘O’ in your hair with your fingers.
Anyway, I applied dry shampoo and teased the crown of my head for volume. I pulled up a section of hair towards the bottom, snapped in my weave and repeated this step once more only up a little higher. I only applied two tracks (or wefts as the snooty people call them). If you need more, throw on more. There are tutorials all over the Internet telling you how to apply them. I would tell you but I had blood drawn today to diagnose my typhoid and my arm hurts. Sue me. After all of my weave was attached, I pulled my bangs back into a bobby pin at the top of my head. I have long bangs but I knew they’d come out of the braid and I didn’t feel like dicking with that today.
Next, I followed these steps I found on Pinterest with a little bit of modification. Gather all of your hair to the side you want your braid to run down and secure it with a clear elastic ponytail holder. Create an ‘O’ in your hair with your fingers.
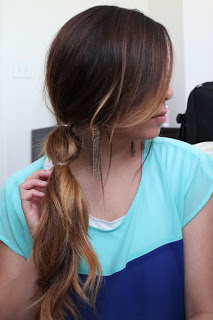 | 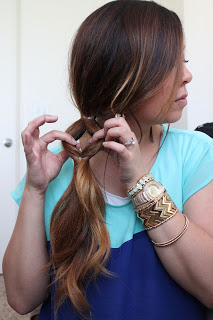 |
Tie the remaining hair in a braid. Not all the way down, just a few passes.
Fold it forward, up and through the hole. Then pull down and through the O.
Go back and piece it out or else it will make your hair want to flip back.
Braiding it also helps if you have layers to keep it all together. Repeat.
Fold it forward, up and through the hole. Then pull down and through the O.
Go back and piece it out or else it will make your hair want to flip back.
Braiding it also helps if you have layers to keep it all together. Repeat.
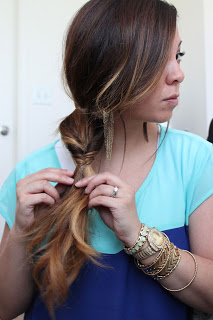 |  |
After the second twist braid, take out the 2nd clear hair tie, then repeat the
process all the way down. If your hair is shorter or you have layers, just
leave in the top hair tie. I liked the look without it and just used bobby pins
to pin back strays that fell out or were too short. It made it more messy looking
which I liked.
process all the way down. If your hair is shorter or you have layers, just
leave in the top hair tie. I liked the look without it and just used bobby pins
to pin back strays that fell out or were too short. It made it more messy looking
which I liked.
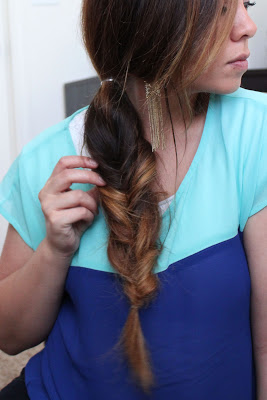 |
Her finished braid is to the left. Her tutorial was clear and very easy for me to follow. I'm going to try it again and fold it through the O a few times instead of once before moving on to the next one to see if I can get mine a little tighter to hold in my layers.
Her blog is called heartsofgold.com if you want to check her out.

2 cups Dr. Bronner's Lavender Scented Pure Castile Soap
3/4 cup coconut oil, melted (you can also use a fractioned coconut oil)
1 tsp Vegetable Glycerin (makes it sudsy)
All you do is mix everything together in a glass jug and you're done! I told you it was easy. My jar came with a nice lid and was only $2.99 at Hobby Lobby after my 40% off coupon. I've read you need to use a glass bottle because it will soak through plastic (I'm guessing from the oils). The ingredients do separate as it sits in your shower so just give it a good shake before you use it.
I really love this soap. You can add essential oils to it if there is a certain scent or healing property you're looking for. I didn't use them in this batch because I didn't like any of the scents at the store. Dr. Bronner's has great antibacterial qualities and is organic so I didn't have to worry about chemicals on my skin. The coconut oil is very moisturizing and doesn't make my skin oily after the shower. I am still using my body lotion at this point. I live in the midwest and the high temperature was 8 degrees last week so my skin gets really pissed off when I shave or shower. I think after a few weeks use, I won't need the lotion but I'll be sure to report back.
In my next batch, I am going to add sweet almond oil. I've heard it does amazing things for your skin and it might be that extra punch of moisture my skin needs. Overall, making this soap wasn't as cheap as a $7 bottle of Dove but my skin is incredibly soft and I have peace of mind knowing I'm not washing my body with a ton of perfumes and chemicals.
WARNING - the oils can make the jar slippery so get a good grip on it unless you're looking for a bruised foot or to lose a piggy.
Sunburn Life Saver
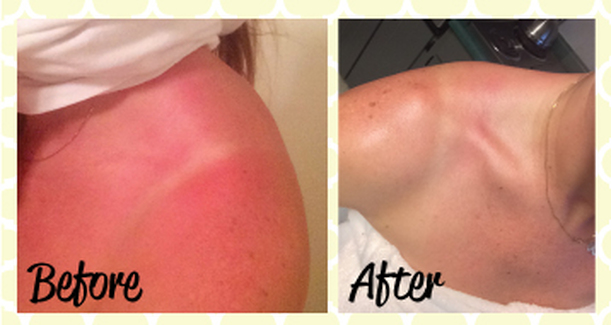
Ladies, Gentlemen and babies, this post is for all of you and YOU. WILL. THANK. ME! Summer is right around the corner and the weather is FINALLY starting to heat up in the Midwest. I am crazy about my skin in general, but summer always has me in an extra tizzy. I am constantly in the sun because I despise winter and few things make me happier than laying out in the sun doing absolutely nothing. This post is for after sun care. You can use just about anything during your basting period but if you want suggestions, I am happy to give those as well, just ask.
I am a pure-breed German, which explains my attitude, but also explains the reddish tint to my skin. I am not super fair skinned but I’m not one of those lucky olive-skinned bitches either. I will get red on occasion but it tans off by the next day. With that in mind, I have found THE solution for sunburns. I am not kidding. I have tried every burn remedy on the planet…or so I thought. I went out of town this weekend and got some sun on the boat. I don’t have my base tan yet for the summer so I got red….or purple…whatever. It was the sunburn that hurts and I was positive it was going to peel. The key to getting your sunburn to not peel is moisture, moisture, moisture. Peeling is dead, dry skin so the more you moisturize it, the less likely it will peel.
Last summer I used Solarcaine which is what hospitals use for burns. I never had burns that severe but I thought it couldn’t hurt to be extra careful and it worked really well but nothing like what I just discovered. Last night I decided to put my coconut oil on my burned skin. My sister did it the other weekend and it worked for her so I thought why the hell not. I put it on before bed not really expecting my slippers to be knocked off this morning but THEY WERE! Not only was the burn completely gone lower on my arms but all of the sting was taken out on my shoulders and it no longer felt like raw skin! This was after ONE application. It’s organic, unrefined coconut oil. You can get it at Trader Joe’s, Whole Foods etc. in the regular cooking oil isle. Use it sparingly and wear old clothes when you apply. It’s actual oil so a little is going to go a long way. Men are so weird about anything scented and they generally don’t give a shit about taking care of their skin so this is the perfect thing for them! It has a light coconut scent but once it’s soaked into your skin, you can’t smell it. So next time your boo doesn’t want to treat his sunburn and would rather bitch about it instead, attack him with coconut oil. It works on sunburns, cooking burns/heat burns etc. My aesthetician uses coconut oil on her infant grandson for various skin things and swears by it. I’m not responsible enough yet to let another human depend on me for survival so I can’t give baby advice but I would absolutely tell you to look into it, especially if you like all natural approaches.
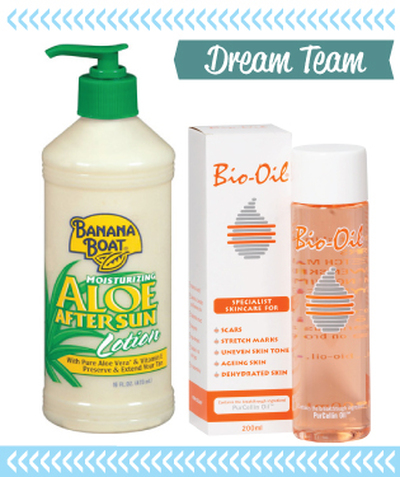
If you are against this whole coconut oil thing (if this is you, not using it is like not accepting gaucho pants were out 5 years ago) I would advise Solarcaine, Bio Oil or if you like aloe gels, without a doubt California Tan Total Insurance Burn Relief is my favorite. If you have a bad burn, I’d apply it every few hours along with a moisturizing oil.
To extend my tan during the summer and into the fall, I apply Banana Boat After Sun Lotion. You can get it for a few dollars at Walmart or your local drug store. I’ve used a lot of the tan extender lotions from salons and, in reality, they all work the same so why spend $20 on a bottle of lotion when you can get the same thing for $4. They always have coupons for $1 off, just check Banana Boat’s website occasionally. They actually have one right now if you click this link. I mix this lotion with bio oil and apply it 1-2 times every day. If you’re in the sun a lot like I am, it’s imperative that your take care of your skin and restore all of the moisture you’re losing by baking yourself.
To extend my tan during the summer and into the fall, I apply Banana Boat After Sun Lotion. You can get it for a few dollars at Walmart or your local drug store. I’ve used a lot of the tan extender lotions from salons and, in reality, they all work the same so why spend $20 on a bottle of lotion when you can get the same thing for $4. They always have coupons for $1 off, just check Banana Boat’s website occasionally. They actually have one right now if you click this link. I mix this lotion with bio oil and apply it 1-2 times every day. If you’re in the sun a lot like I am, it’s imperative that your take care of your skin and restore all of the moisture you’re losing by baking yourself.
Coconut Oil DreamMaker
I’m at it again! First of all, if you're not following me on twitter, why the hell not?! Click HERE to follow me and see how I embarrass my boyfriend in public each day as it's my life goal. I dream big. Anyway, I couldn’t help it, I joined to coconut oil craze. My hair is currently on my nerves because of static. It looks like my hand is constantly on that ball in the Magic House. But this post isn’t about static…I’ll solve that national treasure another day. Today I am sharing my discovery of COCONUT OIL!!! As previously mentioned, my hair is baby fine and I’ve been coloring it since the great Sun In mishap of 2003 so it’s had years of damage. Up until now, I have found products that tame it pretty well but I want something that’s going to heal and strengthen my hair so I can be one of those lucky bitches who doesn’t have to use heating tools to wrangle their mane. People who can air dry and go or blow dry and go have real asshole potential.
I was getting my regular 6 month facial the other week when my aesthetician started talking about coconut oil. She commented on how fantastic my skin looked and I told her I was using BioOil on my face. It seriously turned my skin around. It doesn’t break me out or anything. It evens out my skin tone and leaves my face feeling like a baby’s knee pit. Anyway, I was telling her that I wish I could find something like that for my hair and that’s when she opened the arsenal that is the miracle product of Coconut Oil. She said she cooks with it, rubs it on her skin, hair etc. It’s basically your one-stop-shop in life. I will admit; I’ve tried a lot of weird ass shit in the name of beauty so when she told me about a product I could slather head to toe and use to fry up cheese sticks, I was a little weary but equally pumped.
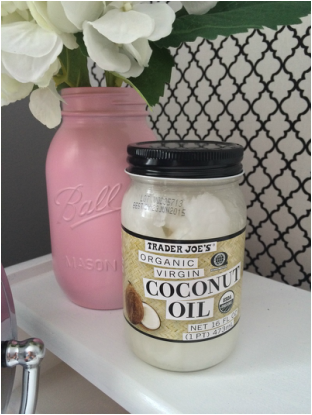
Not trying it would’ve been like someone handing you a gold coin and refraining from biting into it to make sure it was real and not chocolate. So I high tailed it over to Trader Joes. She suggested Trader Joes because it’s organic and virgin. I’m sure you can find it anywhere but at Trader Joes it was in the cooking oil isle. I know. It’s weird.
Before you start slathering this one-hit-wonder all over yourself, you need to be warned. It’s oil and WILL stain your clothing and furniture so get your shit together and be careful. If you’re using it as a body moisturizer, grab a tablespoon and pull out a small amount. It’s about the consistency of Crisco so don’t freak out. It will melt in your hands when you start rubbing them together or you can put a few tablespoons in the microwave and melt it that way. I personally, think melting it before is going to make a bigger mess. I stand in the tub and just go to town. I use about 1 heaping tablespoon for both legs and another one or two for my upper body or you can heat some in your hands and squirt your daily moisturizer in it. I would suggest applying in smaller amounts at a time because it melts fast and is easier to handle. You will need to work it in a little, it won’t just absorb immediately into your skin like regular cream lotion. I’d wear a pair of old jams when you’re done. I haven’t had it ruin any clothing but I’d rather be safe than sorry. I do it about an hour before bedtime so when I go to bed, it has soaked in and doesn’t get on my sheets. I will also warn you that it smells exactly like you’d think…coconut grease. Think of coconut scented Crisco. I’m not a huge fan but once it’s on and soaking in, you can’t smell it. It’s a total turnaround for your skin. I do it 2-3 times a week because the air is so cold and dry where I live, my skin is dying of thirst.
I was getting my regular 6 month facial the other week when my aesthetician started talking about coconut oil. She commented on how fantastic my skin looked and I told her I was using BioOil on my face. It seriously turned my skin around. It doesn’t break me out or anything. It evens out my skin tone and leaves my face feeling like a baby’s knee pit. Anyway, I was telling her that I wish I could find something like that for my hair and that’s when she opened the arsenal that is the miracle product of Coconut Oil. She said she cooks with it, rubs it on her skin, hair etc. It’s basically your one-stop-shop in life. I will admit; I’ve tried a lot of weird ass shit in the name of beauty so when she told me about a product I could slather head to toe and use to fry up cheese sticks, I was a little weary but equally pumped.
Not trying it would’ve been like someone handing you a gold coin and refraining from biting into it to make sure it was real and not chocolate. So I high tailed it over to Trader Joes. She suggested Trader Joes because it’s organic and virgin. I’m sure you can find it anywhere but at Trader Joes it was in the cooking oil isle. I know. It’s weird.
Before you start slathering this one-hit-wonder all over yourself, you need to be warned. It’s oil and WILL stain your clothing and furniture so get your shit together and be careful. If you’re using it as a body moisturizer, grab a tablespoon and pull out a small amount. It’s about the consistency of Crisco so don’t freak out. It will melt in your hands when you start rubbing them together or you can put a few tablespoons in the microwave and melt it that way. I personally, think melting it before is going to make a bigger mess. I stand in the tub and just go to town. I use about 1 heaping tablespoon for both legs and another one or two for my upper body or you can heat some in your hands and squirt your daily moisturizer in it. I would suggest applying in smaller amounts at a time because it melts fast and is easier to handle. You will need to work it in a little, it won’t just absorb immediately into your skin like regular cream lotion. I’d wear a pair of old jams when you’re done. I haven’t had it ruin any clothing but I’d rather be safe than sorry. I do it about an hour before bedtime so when I go to bed, it has soaked in and doesn’t get on my sheets. I will also warn you that it smells exactly like you’d think…coconut grease. Think of coconut scented Crisco. I’m not a huge fan but once it’s on and soaking in, you can’t smell it. It’s a total turnaround for your skin. I do it 2-3 times a week because the air is so cold and dry where I live, my skin is dying of thirst.
Next application: hair. This works on all hair types. The coconut oil is supposed to be so great because it’s VERY moisturizing. I saw measurements on another website for how much you’re suppose to use based on hair thickness and length but I think that’s kind of silly. You should use however much you need to saturate your hair. Since it does turn into an oil, you don’t want it soaking wet that it starts to run all over the place. I took the advice of this website and used WAY too much. I got the same result with the abundance that I did with a cut back portion. I have long thinner hair so I use about 3 tablespoons total. You will obviously use more if you have thick hair.
STEPS:
1. Comb dry/dirty hair free of tangles
2. Scoop out a little less than a tablespoon into your hand (again, it will melt fast so it’s easier and less of a mess to use smaller amounts.)
3. Rub hands together to melt oil and apply to ends and shaft of hair. (I don’t put this on my roots because I have oily scalp and I really don’t need anything making it MORE oily. So I start about 5 inches down from the root at the start of the hair shaft. I just work it in how you would anything else.
4. Once my hands are dry, I go back for another scoop. Once you think you have enough, brush it out. If your locks aren’t saturated, go back for another shot.
5. When I feel satisfied, I pile it on the top of my head in a bun. The longer you leave it on, the better.
I sleep with coconut oil on mine. I do this about an hour or two before bedtime so it’s had a chance to dry and soak before I touch my pillow. If you’re worried about it, just put on an old pillowcase or wrap an old towel around your head. Do not dry it with a blow dryer. It will just re-melt the oil and you will have a mess to clean up. The next morning, shampoo as normal. You want to get in a good shampoo if you put it on your scalp. If you didn’t and your hair is really dry, just shampoo your roots and try to leave as much oil in your hair as your can so it can continue to moisturize the next day. If you have dry scalp, this would be wonderful for you. My sister has thicker hair and she tried the wonder of coconut oil as well. Her hair was so soft, she thought it was wet! It wasn’t. It was dry and she was delusional.
If you’re trying to get your hair to grow faster, you can magnify this treatment by putting an egg into the mixture. I’m not thrilled with the idea of sleeping with egg in my hair so I haven’t tried this yet. But the egg has tons of protein and vitamin D which are essential in hair growth. If you need a little boost beyond coconut oil, I highly recommend Biotin 5,000mcg. It's a vitamin that you can find in any drugstore or supermarket. If I have a weekend day where I’m not leaving the house, I will try the egg and report back. If you want to try it, I would melt the coconut oil in the microwave, just for a few seconds, and mix the egg in. If you try coconut oil, let me know what you think and if something worked better for you than what I’ve suggested!
Gel Polish Dream
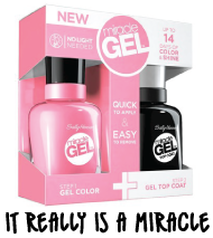
Alright ya’ll. I have found THE product. If you’ve been uninterested in anything else I have written about, this is the one to pay attention to and try. I say I’m obsessed with a lot of things but there aren’t words to describe my infatuation with this polish. I don’t wear acrylic nails because my real ones grow too fast. They are always long and strong (I could be a 13 year old boy about that comment but I will resist my urge…ok after that line I will resist). While my nails are long and strong (insert giggle, ok I’m really done), polish only lasts on them for 3-4 days before chipping. I am on a keyboard 50 hours a week so my polish is always prone to chipping.I have always been an OPI and Essie girl. I rarely stray into other polish brands unless I go to the salon for a shellac mani. With that said, I have dabbled into the Red Carpet line of at-home shellac polish. You buy the base gel, color coat gel, top coat gel and light and you can do the same thing at home that they do in the salon. For those who don’t know what gel polish is, it’s just like regular nail polish but made of gel-like properties. Ok so I don’t know the science behind it but you put the shit on, hold it under a tanning bed lamp looking deal and it cures/hardens the polish in seconds. You don’t have to wait for your nails to dry, they are instantly dry, and it lasts at least 2 weeks on me without a chip. It would last even longer but I prefer to not have fingernails as weapons so I have to take it off and clip my daggers. The Red Carpet gel polish was great and lasted the same amount of time the salon gel does but it takes over an hour to apply, was expensive for a tiny ass bottle and is a pain in the ass to get off. You have to put your hand under the light after each application so 1 finger makes 4 passes under the light at about 2 minutes each time before it’s done.
My sister and I were extreme couponing the other week and we saw a coupon for the Sally Hansen Miracle Gel polish. It claimed to come off just like regular polish and you didn’t need a light to cure it. Of course we had to immediately run out and try it. There are coupons for $2 off a bottle right now on various websites so snag one and try this shit. A lot of gel polishes come in tiny ass bottles and you only get a few applications out of it and it’s expensive. This polish comes in a big ass bottle and it runs for about $9.99 at Walgreens. The website says you can also buy it at Walmar, ULTA, Target, CVS etc. With the $2 off coupon, that’s not a bad price for a bottle of gel polish. They also have duo packs that have the colored coat and gel top coat for only $14.99 which is an even better deal with the coupon.
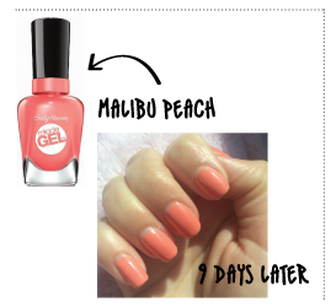
The photo to the right is the first color I tried called Malibu Peach. It was the perfect coral shade, not too orange, not too pink and this is about 9 days after I applied. I worked all week, went fishing, swimming, boating etc. and only one nail started to ware in the corner. I was impressed. I wasn’t ready to give it my stamp of approval until I tested the removal process. With gel you have to soap your nails in acetone for about 10 minutes, scrape it off, soak again etc. Or you can put soaked cotton balls with acetone into a little strip of tin foil, attach it to the top of each nail, let it sit, scrape it, put back on, sit, scrape, you get the idea. This polish came right off just as promised. It actually came off easier than some OPI polishes I’ve tried.
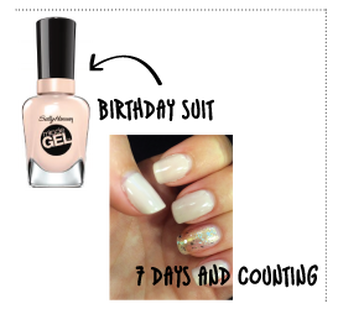
The second color I tried is called Birthday Suit (pictured to the left). It was a perfect shade of nude. I’m always careful about nude polish because some shades just make my nails look dirty so I was a little weary but I LOVE it. This color took 3 coats, Malibu Peach only took 2. I don’t like my polish to be shear. If you do, you’d only need 2 coats of Birthday Suit. My statement nail is Hors D’oeurvres by Essie.
It Really Works Ya'll
Alright ya'll. I have blogged about ItWorks on my old blog so if you are Blogging Wench reader then you may have read this one before. I am moving over my most popular posts and this one was, by far, one of the most popular. Joining this company has been the single best decision I have ever made. I have been told I'm changing people's lives and it has been the most rewarding job I have ever had.If you'd like to join my team, we are hauling balls, kicking ass, you get it, tweet me, leave a comment of contact me below! I have clients using these wraps for several different things. Some people are trying to lose weight and are hitting a plateau and need a boost. Others are wanting to lose but need some motivation to get started and my favorite customers are postpartum moms. When they wrap, they see the results right away and it gives them the drive to hit the gym and watch their caloric intake to keep it off and do even more. Others use the wraps to show off all of their hard work. Often times there are indeed abs under there, you just can't see them. The wraps put your 6pack on display. Suns out, guns out! They aren't just for women either, I have had A LOT of men emailing me about the wraps.
Below I have listed a few of my favorite products and best sellers. Another best seller and personal favorite are the Hair, Skin, Nail Vitamins that I will post about shortly. My hair grew 3+ inches in 6 weeks!! If you have questions about any of them, by all means leave me a comment or you can contact me from the contact card and I'd love to help you.

The ultimate body applicator aka "wrap" come in a box of 4 which is a full treatment. A lot of people see results after 1 but the more you do in the treatment, the better you results. Here is an application video and what to expect. I love her accent!! I'm going to work on mine and talk like her all day tomorrow.
Click HERE to get your wraps in the mail. If you'd like to order, I'd encourage you to contact me so I can help you get the best deals possible. You can holler by clicking HERE and scroll to the bottom.
____________________________________________________________________
 _________________________________________________________________
The Defining Gel is a body contouring lotion/gel and has several amazing uses. It is legit the only thing I have ever tried that has even touched my cellulite. My cellulite is smooth, dimples are gone and my skin is the softest it's ever been. It can also be used on varicose veins, stretch marks, improves skins tightness and texture.
The Stretch Mark cream is a moisturizing body cream. It minimizes the appearance of stretch makes, fine lines, scars and balances skin tone. When it's my turn to procreate, you can guaran-F-ing-tee I will have this on my body every second of every day during and post-partum.
No comments:
Post a Comment